
Centos7 Oracle 19c 복기겸 간략 설명{2023년04월26~27일}
가이드라인
https://docs.oracle.com/en/database/oracle/oracle-database/index.html
Oracle Database Documentation - Oracle Database
docs.oracle.com
이부분에 대해서는 상세한 설명 보다는 이미지를 많이 캡쳐하여 올릴 예정이며,
2번째 설치인 만큼 조금더 보안한 부분이 많아 질 것으로 예상된다.

네트워크 설정
[root@localhost ~]# cd /etc/sysconfig/network-scripts
[root@localhost network-scripts]# ls
ifcfg-ens33  ifdown-eth   ifdown-post    ifdown-Team      ifup-aliases  ifup-ipv6   ifup-post    ifup-Team      init.ipv6-global
ifcfg-lo     ifdown-ippp  ifdown-ppp     ifdown-TeamPort  ifup-bnep     ifup-isdn   ifup-ppp     ifup-TeamPort  network-functions
ifdown       ifdown-ipv6  ifdown-routes  ifdown-tunnel    ifup-eth      ifup-plip   ifup-routes  ifup-tunnel    network-functions-ipv6
ifdown-bnep  ifdown-isdn  ifdown-sit     ifup             ifup-ippp     ifup-plusb  ifup-sit     ifup-wireless
[root@localhost network-scripts]# vi ifcfg-ens33
[root@localhost network-scripts]# cat ifcfg-ens33
TYPE="Ethernet"
PROXY_METHOD="none"
BROWSER_ONLY="no"
BOOTPROTO="manual"
DEFROUTE="yes"
IPV4_FAILURE_FATAL="no"
IPV6INIT="yes"
IPV6_AUTOCONF="yes"
IPV6_DEFROUTE="yes"
IPV6_FAILURE_FATAL="no"
IPV6_ADDR_GEN_MODE="stable-privacy"
NAME="ens33"
UUID="bdd9544a-344d-461a-a89f-0817d6e6bff9"
DEVICE="ens33"
ONBOOT="yes"
IPADDR="192.168.0.129"
NETMASK="255.255.255.0"
GATEWAY="192.168.0.1"
DNS1="162.126.63.1"
DNS2="162.126.63.2"

#DNS 추가는 인터넷 연결이 그래도 안될때 사용하도록하면된다. 예상으로는 방화벽 문제인 것으로 판단된다.
yum 설정
[root@localhost ~]# cd /etc/yum
[root@localhost yum]# ls
fssnap.d  pluginconf.d  protected.d  vars  version-groups.conf
[root@localhost yum]# mkdir repos.d
[root@localhost yum]# cd repos.d/
[root@localhost repos.d]# vi daum.repo
[root@localhost repos.d]# cat daum.repo
[base]
name=CentOS-$releasever - Base
baseurl=http://ftp.daum.net/centos/7/os/$basearch/
gpgcheck=1
gpgkey=http://ftp.daum.net/centos/RPM-GPG-KEY-CentOS-7

[updates]
name=CentOS-$releasever - Updates
baseurl=http://ftp.daum.net/centos/7/updates/$basearch/
gpgcheck=1
gpgkey=http://ftp.daum.net/centos/RPM-GPG-KEY-CentOS-7

[extras]
name=CentOS-$releasever - Extras
baseurl=http://ftp.daum.net/centos/7/extras/$basearch/
gpgcheck=1
gpgkey=http://ftp.daum.net/centos/RPM-GPG-KEY-CentOS-7

[centosplus]
name=CentOS-$releasever - Plus
baseurl=http://ftp.daum.net/centos/7/centosplus/$basearch/
gpgcheck=1
gpgkey=http://ftp.daum.net/centos/RPM-GPG-KEY-CentOS-7

[root@localhost yum]# yum update
yum update 이후 문제 발생
[root@localhost ~]# yum update
Loaded plugins: langpacks, product-id, search-disabled-repos, subscription-manager
This system is not registered with an entitlement server. You can use subscription-manager to register.
http://ftp.daum.net/centos/7/os/x86_64/repodata/repomd.xml: [Errno 14] curl#6 - "Could not resolve host: ftp.daum.net; Unknown error"
Trying other mirror.


 One of the configured repositories failed (CentOS-7Server - Base),
 and yum doesn't have enough cached data to continue. At this point the only
 safe thing yum can do is fail. There are a few ways to work "fix" this:

     1. Contact the upstream for the repository and get them to fix the problem.

     2. Reconfigure the baseurl/etc. for the repository, to point to a working
        upstream. This is most often useful if you are using a newer
        distribution release than is supported by the repository (and the
        packages for the previous distribution release still work).

     3. Run the command with the repository temporarily disabled
            yum --disablerepo=base ...

     4. Disable the repository permanently, so yum won't use it by default. Yum
        will then just ignore the repository until you permanently enable it
        again or use --enablerepo for temporary usage:

            yum-config-manager --disable base
        or
            subscription-manager repos --disable=base

     5. Configure the failing repository to be skipped, if it is unavailable.
        Note that yum will try to contact the repo. when it runs most commands,
        so will have to try and fail each time (and thus. yum will be be much
        slower). If it is a very temporary problem though, this is often a nice
        compromise:

            yum-config-manager --save --setopt=base.skip_if_unavailable=true

failure: repodata/repomd.xml from base: [Errno 256] No more mirrors to try.
http://ftp.daum.net/centos/7/os/x86_64/repodata/repomd.xml: [Errno 14] curl#6 - "Could not resolve host: ftp.daum.net; Unknown error"
위와 같은 문제점이 발생되는 이유는 인터넷이 끊겼다고 하는데, 아무런 문제없이 진행되고 있는 인터넷.
그렇다는 것은 현재 대역폭 문제라는 뜻이다. 현재 진행하고 있는 인터넷은 NAT으로 사용하고 있는데 가끔 충돌로 인해 문제점이 발생되니 큰 문제가 아니라면 bridged로 연결을 바꾸어 사용하길 바란다.
rpm 대신 커널 파라미터 값 직접 설정하기
[root@localhost /]# vi /etc/sysctl.conf# sysctl settings are defined through files in
# /usr/lib/sysctl.d/, /run/sysctl.d/, and /etc/sysctl.d/.
#
# Vendors settings live in /usr/lib/sysctl.d/.
# To override a whole file, create a new file with the same in
# /etc/sysctl.d/ and put new settings there. To override
# only specific settings, add a file with a lexically later
# name in /etc/sysctl.d/ and put new settings there.
#
# For more information, see sysctl.conf(5) and sysctl.d(5).맨 아래에 추가하기
# Controls the maximum shared segment size, in bytes
kernel.shmmax = 68719476736
# Controls the maximum number of shared memory segments, in pages
kernel.shmall = 10523004
kernel.shmmni = 4096
kernel.sem = 250 32000 100 128
fs.aio-max-nr = 1048576
fs.file-max = 6815744
net.ipv4.ip_local_port_range = 9000 65500
net.core.rmem_default = 262144
net.core.rmem_max = 4194304
net.core.wmem_default = 262144
net.core.wmem_max = 1048586[root@localhost /]# cat /etc/sysctl.conf
# sysctl settings are defined through files in
# /usr/lib/sysctl.d/, /run/sysctl.d/, and /etc/sysctl.d/.
#
# Vendors settings live in /usr/lib/sysctl.d/.
# To override a whole file, create a new file with the same in
# /etc/sysctl.d/ and put new settings there. To override
# only specific settings, add a file with a lexically later
# name in /etc/sysctl.d/ and put new settings there.
#
# For more information, see sysctl.conf(5) and sysctl.d(5).
# Controls the maximum shared segment size, in bytes
kernel.shmmax = 68719476736

# Controls the maximum number of shared memory segments, in pages
kernel.shmall = 10523004
kernel.shmmni = 4096
kernel.sem = 250 32000 100 128

fs.aio-max-nr = 1048576
fs.file-max = 6815744

net.ipv4.ip_local_port_range = 9000 65500

net.core.rmem_default = 262144
net.core.rmem_max = 4194304
net.core.wmem_default = 262144
net.core.wmem_max = 1048586커널 파라미터 값 적용
[root@localhost /]# /sbin/sysctl -pkernel.shmmax = 68719476736
kernel.shmall = 10523004
kernel.shmmni = 4096
kernel.sem = 250 32000 100 128
fs.aio-max-nr = 1048576
fs.file-max = 6815744
net.ipv4.ip_local_port_range = 9000 65500
net.core.rmem_default = 262144
net.core.rmem_max = 4194304
net.core.wmem_default = 262144
net.core.wmem_max = 104858619c 의 경우 rpm을 통해 편하기 진행도 가능
하지만 현재는 19c도 직접 커널 파라미터 값을 직접 설정해보고자 rpm 설치를 배재하였다.
[root@localhost oracle]# yum install https://yum.oracle.com/repo/OracleLinux/OL7/latest/x86_64/getPackage/oracle-database-preinstall-19c-1.0-1.el7.x86_64.rpm
유저의 자원 사용 제한 값을 설정
[root@localhost ~]# vi /etc/security/limits.conf# - a group name, with @group syntax
# - the wildcard *, for default entry
# - the wildcard %, can be also used with %group syntax,
# for maxlogin limit
#
#<type> can have the two values:
# - "soft" for enforcing the soft limits
# - "hard" for enforcing hard limits
#
#<item> can be one of the following:
# - core - limits the core file size (KB)
# - data - max data size (KB)
# - fsize - maximum filesize (KB)
# - memlock - max locked-in-memory address space (KB)
# - nofile - max number of open file descriptors
# - rss - max resident set size (KB)
# - stack - max stack size (KB)
# - cpu - max CPU time (MIN)
# - nproc - max number of processes
# - as - address space limit (KB)
# - maxlogins - max number of logins for this user
# - maxsyslogins - max number of logins on the system
# - priority - the priority to run user process with
# - locks - max number of file locks the user can hold
# - sigpending - max number of pending signals
# - msgqueue - max memory used by POSIX message queues (bytes)
# - nice - max nice priority allowed to raise to values: [-20, 19]
# - rtprio - max realtime priority
#
#<domain> <type> <item> <value>
#
#* soft core 0
#* hard rss 10000
#@student hard nproc 20
#@faculty soft nproc 20
#@faculty hard nproc 50
#ftp hard nproc 0
#@student - maxlogins 4
# End of file맨 아래에 추가하기
oracle soft nproc 2048
oracle hard nproc 65536
oracle soft nofile 1024
oracle hard nofile 65536[root@localhost /]# cat /etc/security/limits.conf
# /etc/security/limits.conf
#
#This file sets the resource limits for the users logged in via PAM.
#It does not affect resource limits of the system services.
#
#Also note that configuration files in /etc/security/limits.d directory,
#which are read in alphabetical order, override the settings in this
#file in case the domain is the same or more specific.
#That means for example that setting a limit for wildcard domain here
#can be overriden with a wildcard setting in a config file in the
#subdirectory, but a user specific setting here can be overriden only
#with a user specific setting in the subdirectory.
#
#Each line describes a limit for a user in the form:
#
#<domain> <type> <item> <value>
#
#Where:
#<domain> can be:
# - a user name
#        - a group name, with @group syntax
#        - the wildcard *, for default entry
#        - the wildcard %, can be also used with %group syntax,
#                 for maxlogin limit
#
#<type> can have the two values:
#        - "soft" for enforcing the soft limits
#        - "hard" for enforcing hard limits
#
#<item> can be one of the following:
#        - core - limits the core file size (KB)
#        - data - max data size (KB)
#        - fsize - maximum filesize (KB)
#        - memlock - max locked-in-memory address space (KB)
#        - nofile - max number of open file descriptors
#        - rss - max resident set size (KB)
#        - stack - max stack size (KB)
#        - cpu - max CPU time (MIN)
#        - nproc - max number of processes
#        - as - address space limit (KB)
#        - maxlogins - max number of logins for this user
#        - maxsyslogins - max number of logins on the system
#        - priority - the priority to run user process with
#        - locks - max number of file locks the user can hold
#        - sigpending - max number of pending signals
#        - msgqueue - max memory used by POSIX message queues (bytes)
#        - nice - max nice priority allowed to raise to values: [-20, 19]
#        - rtprio - max realtime priority
#
#<domain>      <type>  <item>         <value>
#

#*               soft    core            0
#*               hard    rss             10000
#@student        hard    nproc           20
#@faculty        soft    nproc           20
#@faculty        hard    nproc           50
#ftp             hard    nproc           0
#@student        -       maxlogins       4

# End of file
oracle soft nproc 2048
oracle hard nproc 65536
oracle soft nofile 1024
oracle hard nofile 65536SELinux 설정 해제하기
[root@localhost /]# vi /etc/selinux/config# This file controls the state of SELinux on the system.
# SELINUX= can take one of these three values:
# enforcing - SELinux security policy is enforced.
# permissive - SELinux prints warnings instead of enforcing.
# disabled - No SELinux policy is loaded.
SELINUX=enforcing
# SELINUXTYPE= can take one of three values:
# targeted - Targeted processes are protected,
# minimum - Modification of targeted policy. Only selected processes are protected.
# mls - Multi Level Security protection.
SELINUXTYPE=targetedSELINUX=enforcing 을 SELINUX=disabled로 변경
[root@localhost /]# cat /etc/selinux/config

# This file controls the state of SELinux on the system.
# SELINUX= can take one of these three values:
#     enforcing - SELinux security policy is enforced.
#     permissive - SELinux prints warnings instead of enforcing.
#     disabled - No SELinux policy is loaded.
SELINUX=disabled
# SELINUXTYPE= can take one of three values:
#     targeted - Targeted processes are protected,
#     minimum - Modification of targeted policy. Only selected processes are protected.
#     mls - Multi Level Security protection.
SELINUXTYPE=targeted
유저 생성하기
[root@localhost ~]# groupadd dba
[root@localhost ~]# useradd -g dba oracle
[root@localhost ~]# passwd oracle
Changing password for user oracle.
New password:
Retype new password:
passwd: all authentication tokens updated successfully.
오라클 설치할 디렉터리 생성
[root@localhost ~]# mkdir -p /ora19/app/oracle
[root@localhost ~]# mkdir /ora19/app/oradata
[root@localhost ~]# mkdir /ora19/oraInventory
생성된 유저 권한부여
[root@localhost ~]# chown -R oracle:dba /ora19
[root@localhost ~]# chmod -R 775 /ora19
[root@localhost ~]# mkdir -p /ora19/app/oracle/product/19.0.0/dbhome_1생성된 유저로 접속 후 환경변수 설정
[root@localhost ~]# su - oracle
[oracle@localhost ~]$ vi .bash_profile
# .bash_profile
# Get the aliases and functions
if [ -f ~/.bashrc ]; then
. ~/.bashrc
fi
# User specific environment and startup programs
PATH=$PATH:$HOME/.local/bin:$HOME/bin
export PATH맨 마지막에 추가
export ORACLE_BASE=/ora19/app/oracle
export ORACLE_HOME=$ORACLE_BASE/product/19.0.0/dbhome_1
export ORA_INVENTORY=/ora19/oraInventory
export ORACLE_SID=orcl
export NLS_LANG=AMERICAN_AMERICA.AL32UTF8
export LD_LIBRARY_PATH=$ORACLE_HOME/lib:/lib:/usr/lib:/usr/local/lib
export PATH=$PATH:$ORACLE_HOME/bin
# alias
alias ss='sqlplus / as sysdba'[oracle@localhost ~]$ cat .bash_profile
# .bash_profile

# Get the aliases and functions
if [ -f ~/.bashrc ]; then
        . ~/.bashrc
fi

# User specific environment and startup programs

PATH=$PATH:$HOME/.local/bin:$HOME/bin

export PATH
export ORACLE_BASE=/ora19/app/oracle
export ORACLE_HOME=$ORACLE_BASE/product/19.0.0/dbhome_1
export ORA_INVENTORY=/ora19/oraInventory
export ORACLE_SID=orcl
export NLS_LANG=AMERICAN_AMERICA.AL32UTF8
export LD_LIBRARY_PATH=$ORACLE_HOME/lib:/lib:/usr/lib:/usr/local/lib
export PATH=$PATH:$ORACLE_HOME/bin

# alias
alias ss='sqlplus / as sysdba'X11
구글에서 Xming 프로그램을 다운 받아 설치를 해준다.
이후 x11 환경을 위해 yum을 통해 필요한 자료들을 설치한다.
[root@localhost ~]# yum install xorg*
# x11에 대한 필요한 프로그램 모두 다운로드

[root@localhost ~]# yum install xorg-x11-apps.x86_64
[root@localhost ~]# yum install xorg-x11-xauth.x86_64
[root@localhost ~]# yum install xorg-x11-server-Xorg.x86_64
# 3가지 설치를 해도 되지만, 이번에는 xorg* 진행
reboot 후 확인하면

x11 이 제대로 되었다는 것을 확인할 수 있다.
ssh 환경 설정을 해준다.
[root@localhost ~]# vi /etc/ssh/sshd_configxorg*로 인해 설정이 잡힌것으로 예상되어 있는데
출력내용 중
X11Forwarding no위와 같이 no가 되어 있다면,
X11Forwarding yesyes로 변경 후 저장해주면 된다.
정상 작동 확인을 위해 미리 xclock을 설치해준다. 아마 xorg에 포한되어 설치되어 있을 것이다.
root 환경에서는 정상작동 된다는 것을 확인해볼 수 있다.
[root@localhost ~]# xclock
Warning: Missing charsets in String to FontSet conversion
xclock을 닫고 echo $DISPLAY를 통해 root에 어떠한 주소로 적용 되어 있는지 확인한다.
[root@localhost ~]# echo $DISPLAY
localhost:10.0
이제 생성했던 계정으로 접속해 xclock을 실행해본다.
하지만, oracle에서는 설정을 잡아주지 않았기 때문에 실행이 안될 것이다.
[oracle@localhost ~]$ xclock
Error: Can't open display:
[oracle@localhost ~]$ echo $DISPLAY

[oracle@localhost ~]$
그러므로 해당 계정에 적용을 시켜줘야 한다.
[oracle@localhost ~]$ export DISPLAY=localhost:10.0
[oracle@localhost ~]$ echo $DISPLAY
localhost:10.0
이후 적용을 위해 해당 오라클 계정을 재시작 해준다.
이후 접속 시 서비스 계정으로 접속해서 확인을 해주면 된다.
ORACLE 파일 업로드
ORACLE 홈페이지를 통해 환경에 맞는 19c에 대한 zip 파일을 다운 받아 MobaXterm 혹은 Filezilla를 통해 옮길 수 있다.
[oracle@localhost oracle]$ ls
LINUX.X64_193000_db_home.zip product
[oracle@localhost oracle]$ mv LINUX.X64_193000_db_home.zip product/19.0.0/dbhome_1/
[oracle@localhost oracle]$ cd product/19.0.0/dbhome_1/
[oracle@localhost dbhome_1]$ ls
LINUX.X64_193000_db_home.zip
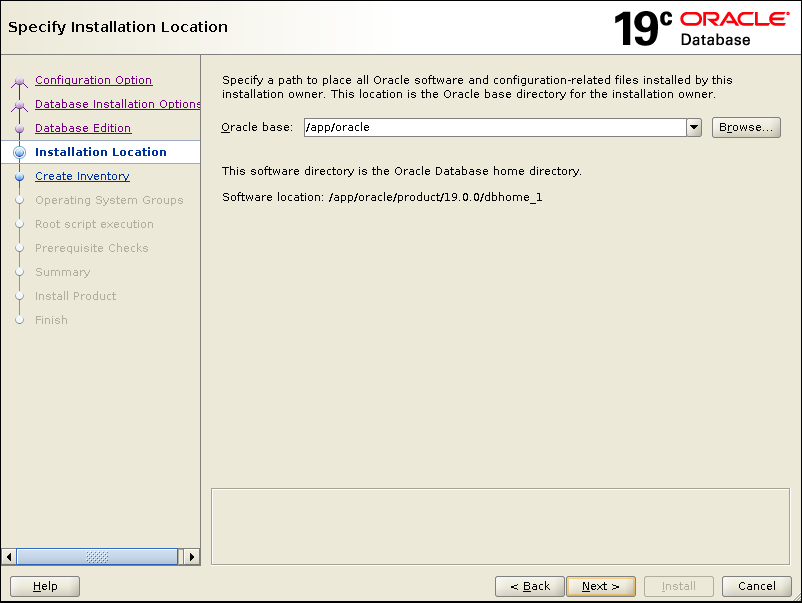
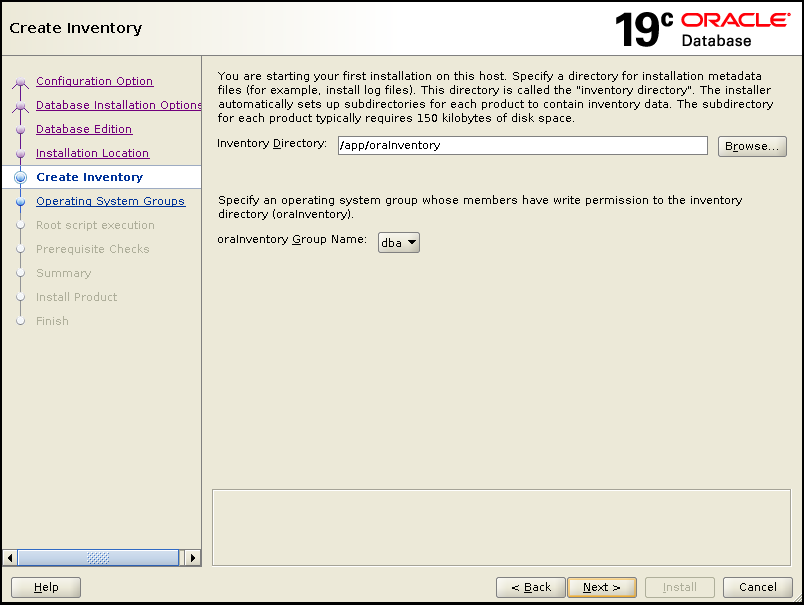
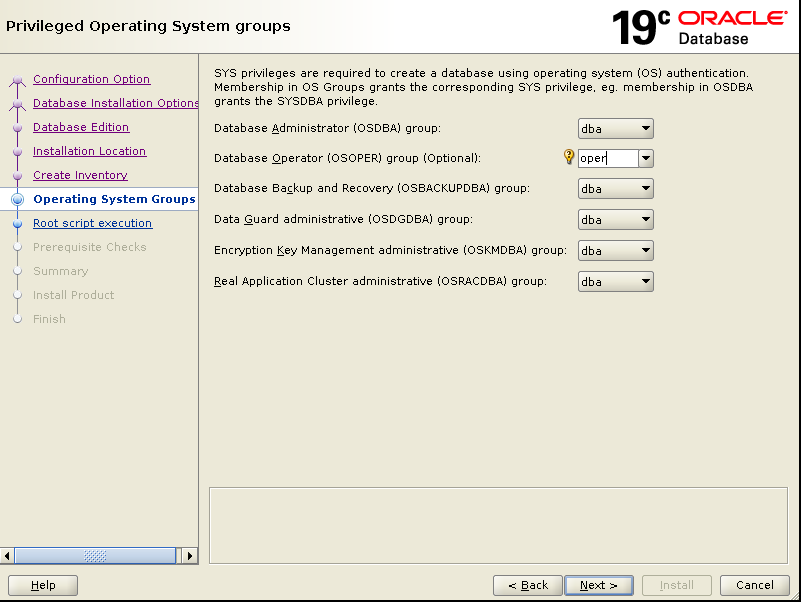
[oracle@localhost dbhome_1]$ unzip LINUX.X64_193000_db_home.zipORACLE 소프트웨어 설치하기
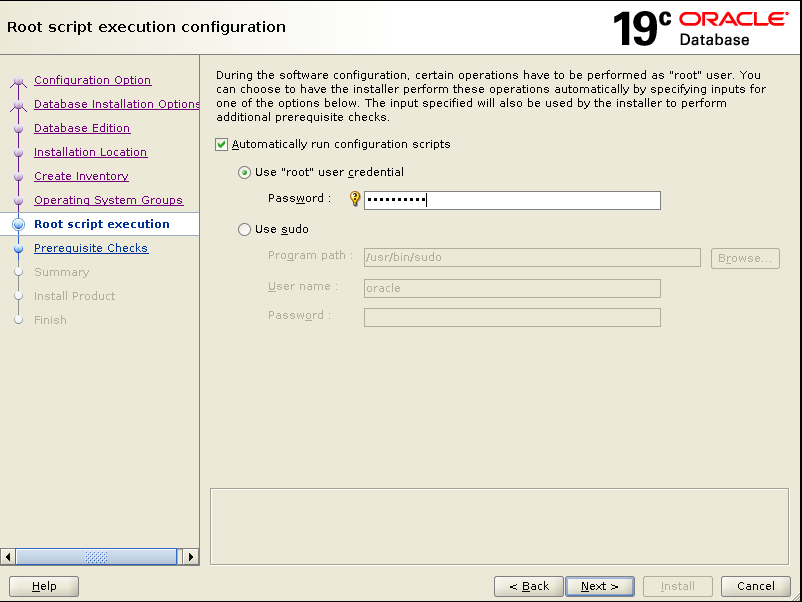
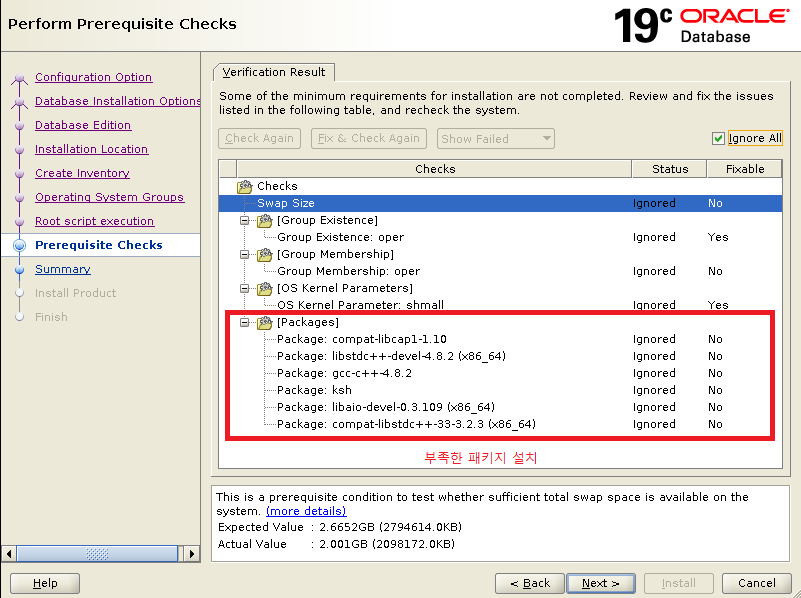
[oracle@localhost dbhome_1]$ ./runInstaller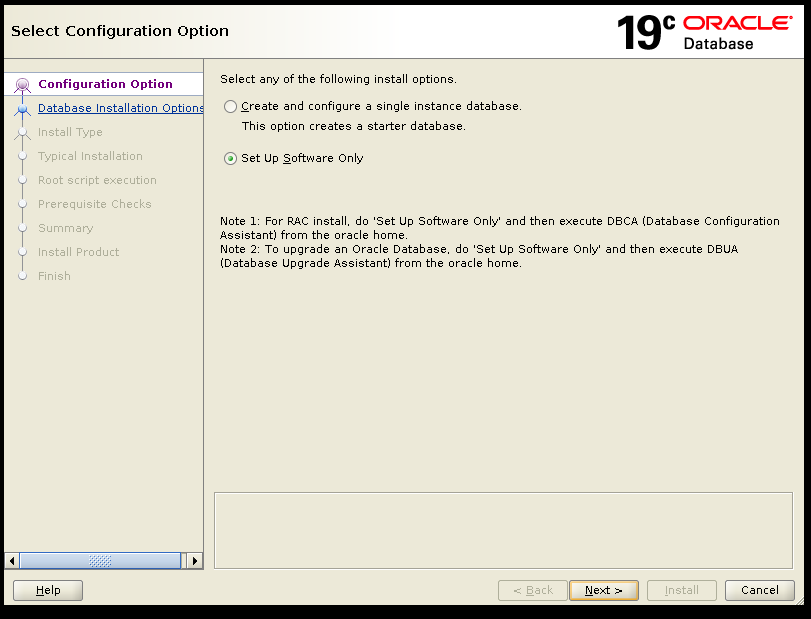


리스너 생성
[oracle@localhost ~]$ netca

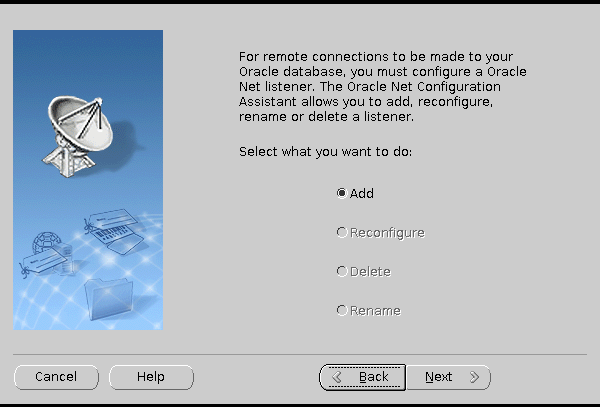
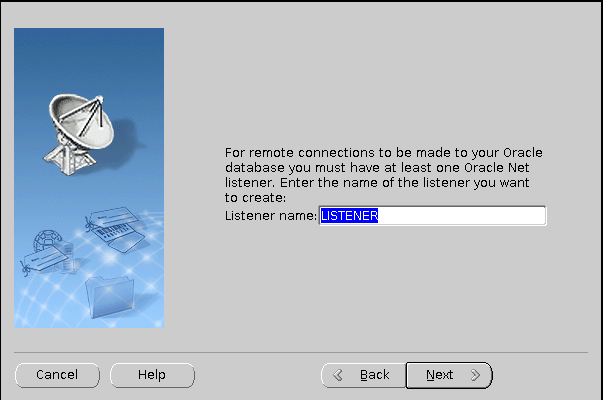

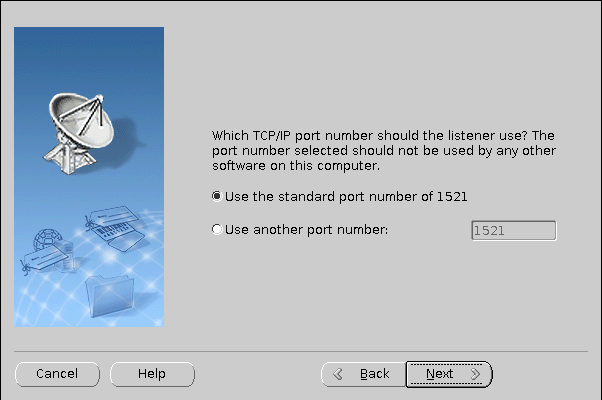

Configuring Listener:LISTENER
Listener configuration complete.
Oracle Net Listener Startup:
    Running Listener Control:
      /app/oracle/product/19.0.0/dbhome_1/bin/lsnrctl start LISTENER
    Listener Control complete.
    Listener started successfully.
Oracle Net Services configuration successful. The exit code is 0
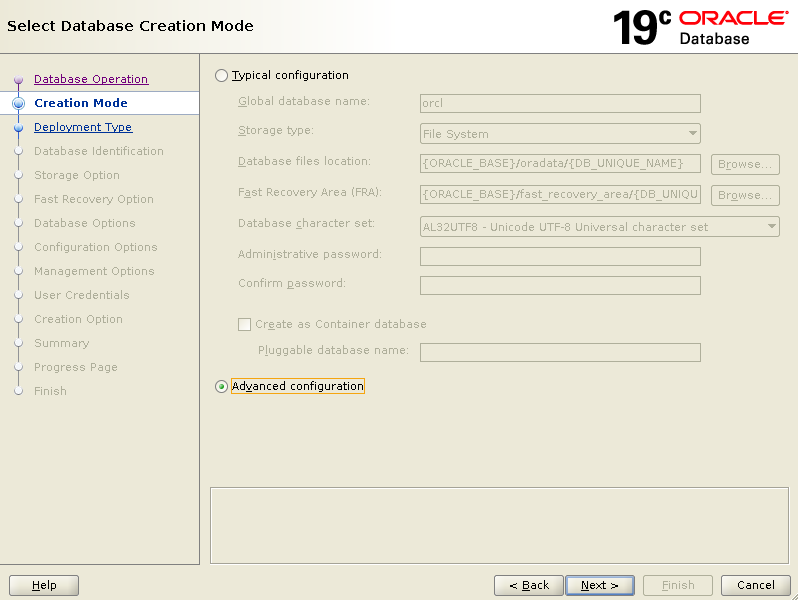
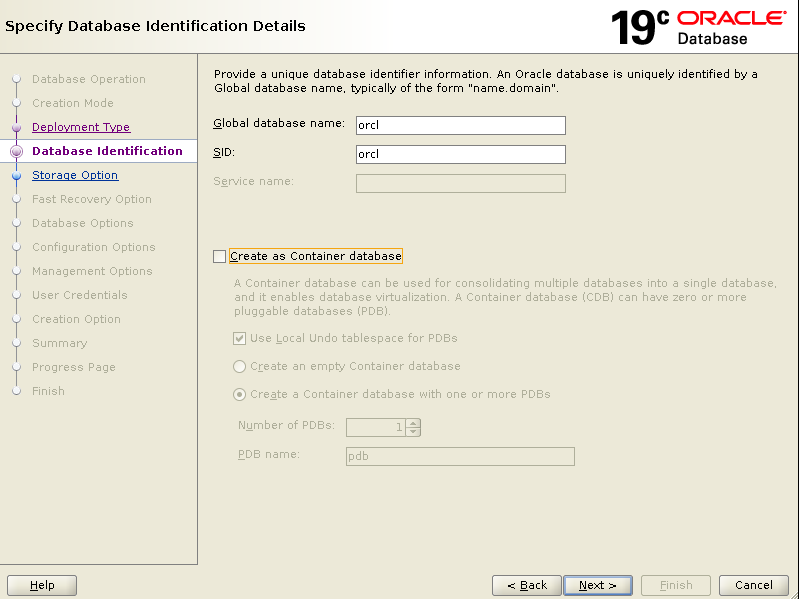
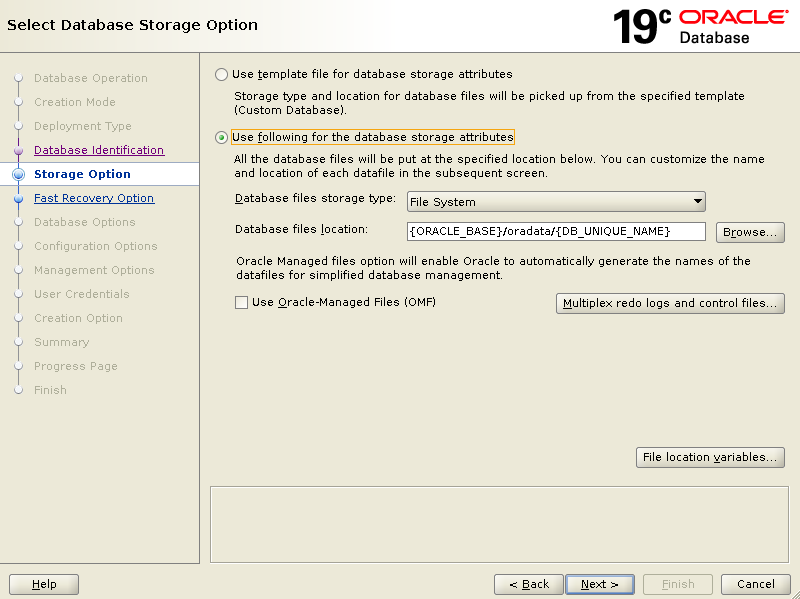
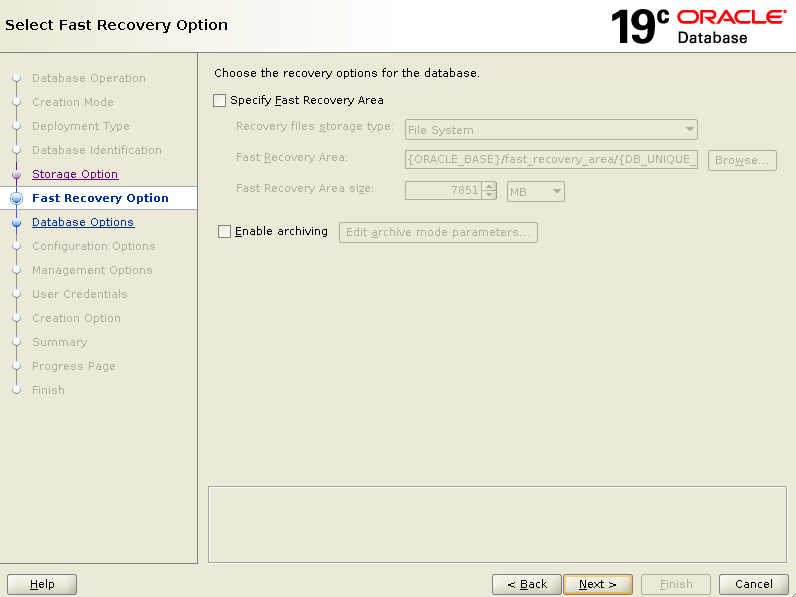
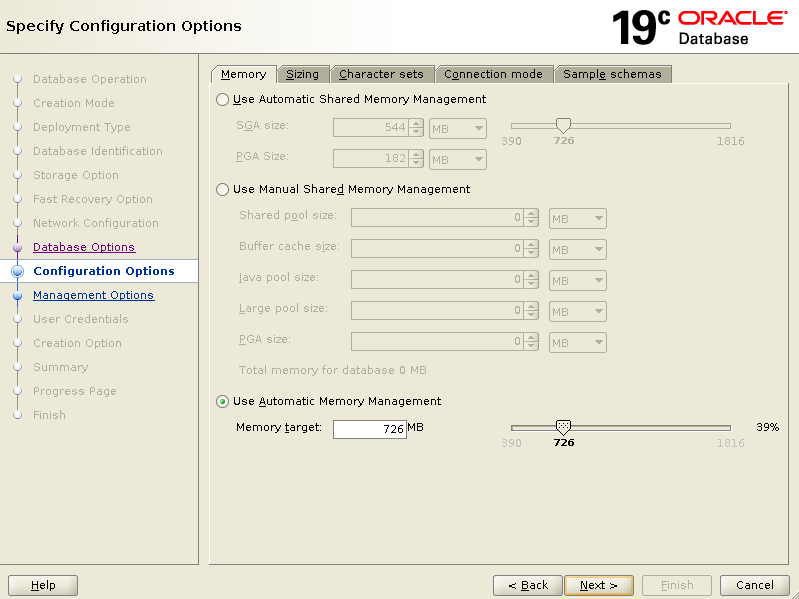
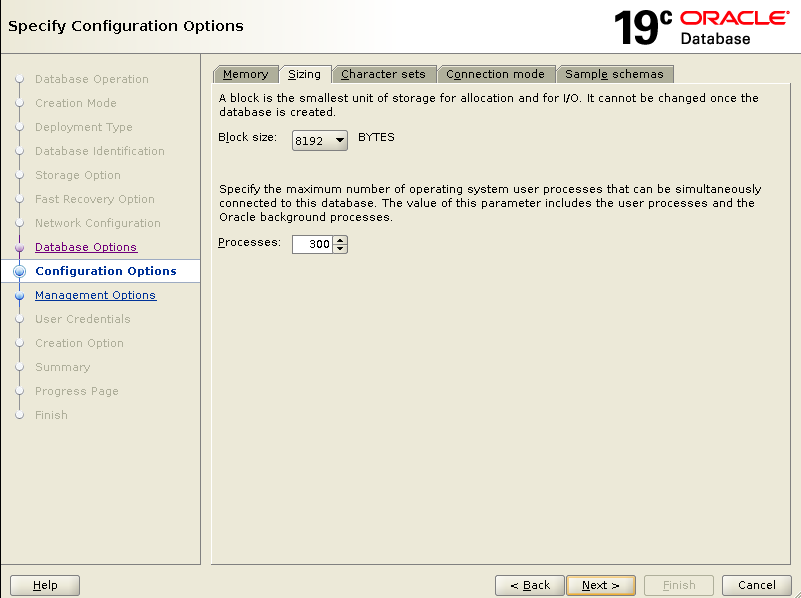
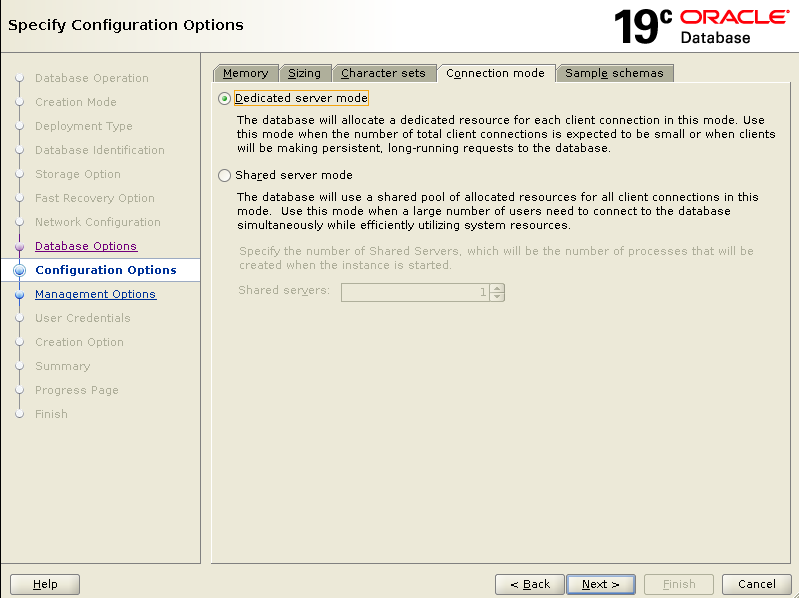
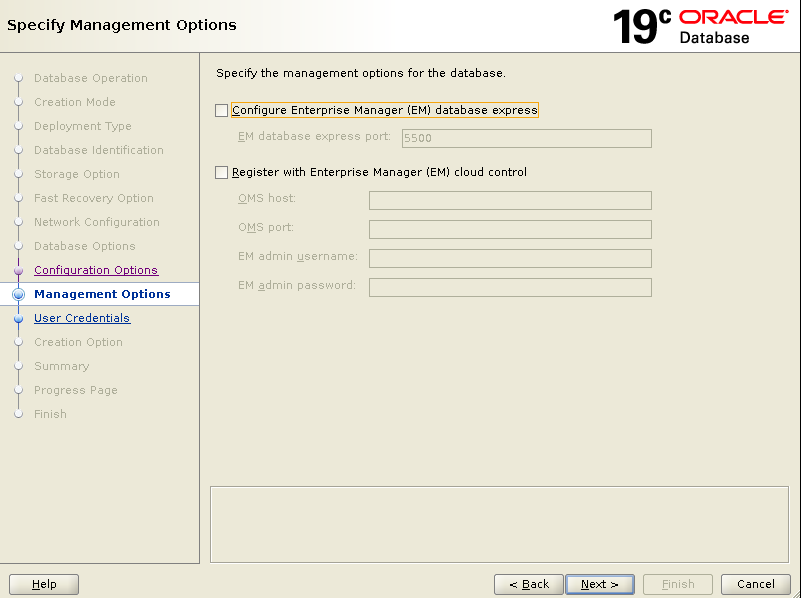
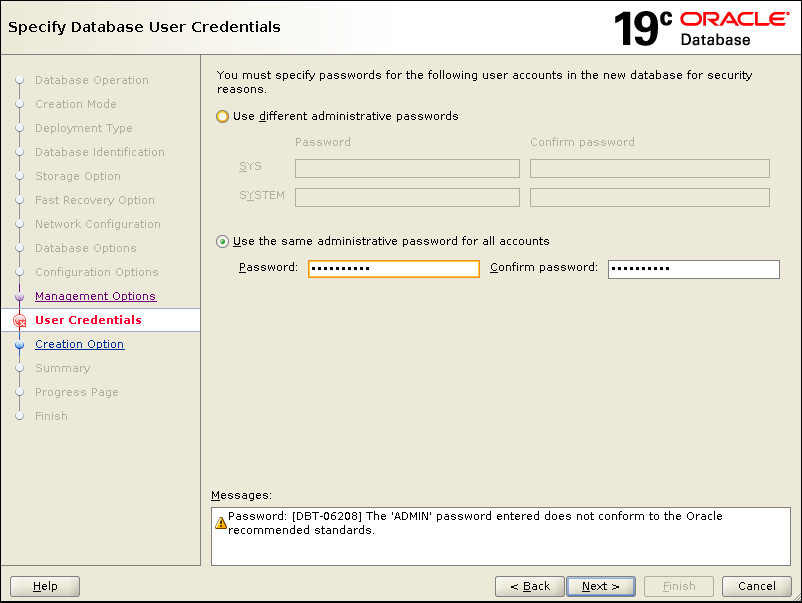
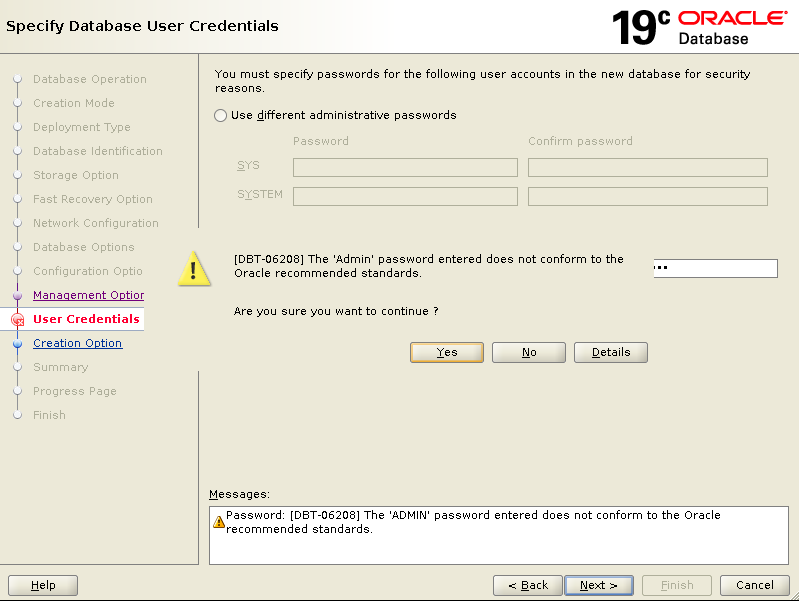
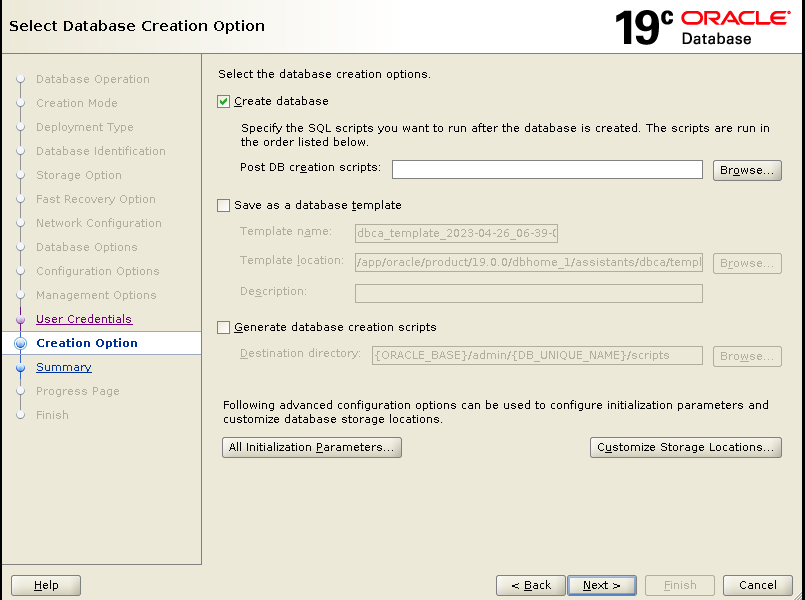
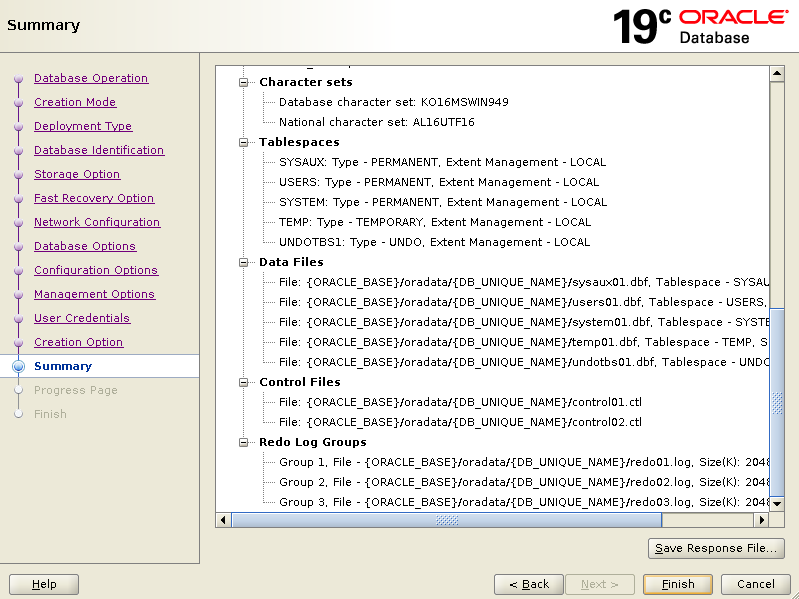
DB 생성
[oracle@localhost ~]$ dbca


데이터베이스 실행
[oracle@localhost ~]$ ss# 실행
SQL> startup
# 실행중지
SQL> shutdown immediate
# 나가기
SQL> exitSQL*Plus: Release 19.0.0.0.0 - Production on Wed Apr 26 20:25:09 2023
Version 19.3.0.0.0
Copyright (c) 1982, 2019, Oracle. All rights reserved.
Connected to an idle instance.
SQL> startup
ORACLE instance started.
Total System Global Area 763359832 bytes
Fixed Size 8901208 bytes
Variable Size 486539264 bytes
Database Buffers 264241152 bytes
Redo Buffers 3678208 bytes
Database mounted.
Database opened.
SQL>리스너 실행
# 리스너 실행 상태 확인
[oracle@localhost ~]$ lsnrctl status
# 리스너 실행 중지
[oracle@localhost ~]$ lsnrctl stop
# 리스너 실행
[oracle@localhost ~]$ lsnrctl start[oracle@localhost ~]$ lsnrctl start
LSNRCTL for Linux: Version 19.0.0.0.0 - Production on 26-APR-2023 21:18:02
Copyright (c) 1991, 2019, Oracle. All rights reserved.
Starting /app/oracle/product/19.0.0/dbhome_1/bin/tnslsnr: please wait...
TNSLSNR for Linux: Version 19.0.0.0.0 - Production
System parameter file is /app/oracle/product/19.0.0/dbhome_1/network/admin/listener.ora
Log messages written to /app/oracle/diag/tnslsnr/localhost/listener/alert/log.xml
Listening on: (DESCRIPTION=(ADDRESS=(PROTOCOL=tcp)(HOST=localhost)(PORT=1521)))
Listening on: (DESCRIPTION=(ADDRESS=(PROTOCOL=ipc)(KEY=EXTPROC1521)))
Connecting to (DESCRIPTION=(ADDRESS=(PROTOCOL=TCP)(HOST=localhost)(PORT=1521)))
STATUS of the LISTENER
------------------------
Alias LISTENER
Version TNSLSNR for Linux: Version 19.0.0.0.0 - Production
Start Date 26-APR-2023 21:18:04
Uptime 0 days 0 hr. 0 min. 0 sec
Trace Level off
Security ON: Local OS Authentication
SNMP OFF
Listener Parameter File /app/oracle/product/19.0.0/dbhome_1/network/admin/listener.ora
Listener Log File /app/oracle/diag/tnslsnr/localhost/listener/alert/log.xml
Listening Endpoints Summary...
(DESCRIPTION=(ADDRESS=(PROTOCOL=tcp)(HOST=localhost)(PORT=1521)))
(DESCRIPTION=(ADDRESS=(PROTOCOL=ipc)(KEY=EXTPROC1521)))
The listener supports no services
The command completed successfully데이터베이스 계정 생성
SQL> create user jslee identified by "jslee1111!";
User created.
SQL> GRANT resource, connect, dba to jslee;
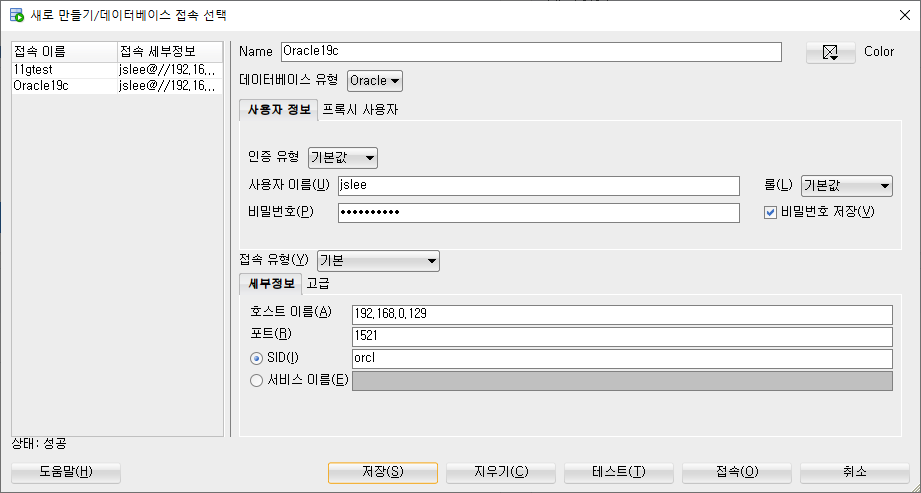
Grant succeeded.SQL Developer 연결
1. listener.ora 설정 변경
[oracle@localhost ~]$ cd $ORACLE_HOME/network/admin
[oracle@localhost admin]$ vi listener.ora
변경 전
# listener.ora Network Configuration File: /app/oracle/product/19.0.0/dbhome_1/network/admin/listener.ora
# Generated by Oracle configuration tools.

LISTENER =
  (DESCRIPTION_LIST =
    (DESCRIPTION =
      (ADDRESS = (PROTOCOL = TCP)(HOST = localhost)(PORT = 1521))
      (ADDRESS = (PROTOCOL = IPC)(KEY = EXTPROC1521))
    )
  )
변경 후
# listener.ora Network Configuration File: /app/oracle/product/19.0.0/dbhome_1/network/admin/listener.ora
# Generated by Oracle configuration tools.
SID_LIST_LISTENER =
   (SID_LIST =
     (SID_DESC =
       (SID_NAME = orcl)
       (ORACLE_HOME = /app/oracle/product/19.0.0/dbhome_1)
     )
   )
LISTENER =
  (DESCRIPTION_LIST =
    (DESCRIPTION =
      (ADDRESS = (PROTOCOL = TCP)(HOST = 192.168.0.129)(PORT = 1521))
      (ADDRESS = (PROTOCOL = IPC)(KEY = EXTPROC1521))
    )
  )

ADR_BASE_LISTENER = /app/oracle
2. tnsnames.ora 설정 변경
[oracle@localhost admin]$ vi tnsnames.ora변경 전
# tnsnames.ora Network Configuration File: /app/oracle/product/19.0.0/dbhome_1/network/admin/tnsnames.ora
# Generated by Oracle configuration tools.

LISTENER_ORCL =
  (ADDRESS = (PROTOCOL = TCP)(HOST = localhost)(PORT = 1521))


ORCL =
  (DESCRIPTION =
    (ADDRESS = (PROTOCOL = TCP)(HOST = localhost)(PORT = 1521))
    (CONNECT_DATA =
      (SERVER = DEDICATED)
      (SERVICE_NAME = orcl)
    )
  )
변경 후
# tnsnames.ora Network Configuration File: /app/oracle/product/19.0.0/dbhome_1/network/admin/tnsnames.ora
# Generated by Oracle configuration tools.

LISTENER_ORCL =
  (ADDRESS = (PROTOCOL = TCP)(HOST = 192.168.0.129)(PORT = 1521))

ORACLR_CONNECTION_DATA =
    (DESCRIPTION =
        (ADDRESS_LIST =
            (ADDRESS = (PROTOCOL = IPC)(KEY = EXTPROC1521))
        )
        (CONNECT_DATA =
           (SID = CLRExtProc)
           (PRESENTATION = RO)
        )
    )

ORCL =
  (DESCRIPTION =
    (ADDRESS = (PROTOCOL = TCP)(HOST = 192.168.0.129)(PORT = 1521))
    (CONNECT_DATA =
      (SERVER = DEDICATED)
      (SERVICE_NAME = orcl)
    )
  )
3. 리스너 종료 후 시작
4. 데이터베이스 종료 후 시작
5. Developer에 필요 내용 작성
만약 텍스트시 제대로 작동이 안된다면, 방화벽 설정을 해준다.
[root@localhost ~]# firewall-cmd --permanent --zone=public --add-port=1521/tcp
success
방화벽 재시작
[root@localhost ~]# systemctl restart firewalld그럼에도 제대로 작동이 안된다면, 방화벽을 끄고 해야한다.
[root@localhost ~]# systemctl stop firewalld